Custom Git Command I Use All The Time!
Using Git Aliases To Simplify Saving Your Changes

Git is awesome, but Git can be cumbersome as well. It seems like Git developers are well aware of that problem; that's why they introduced a feature called Git Aliases. In this article, I'm going to introduce you to Git Aliases and guide you on how to create the one I use virtually every day!
If you just want a quick script for adding the command, jump straight to the TLDR at the end of this article.
What is a Git Alias?
Git Aliases are a way to extend the git command line utils with new commands, perhaps giving an old command a shorter or clearer name. For example, we can create a one-word alias for the command showing us the information about the last commit:
git config --global alias.last 'log -1 HEAD'Immediately after setting the alias, you will be able to use it as a git command:
git lastGetting in response something like this:
commit 297625e0522f5488f7f923d6a1ece4c4f8ebdab8 (HEAD -> git-save-assets, origin/git-save-assets)
Author: Egor Tarasov <vosarat1995@google.com>
Date:   Thu May 15 22:05:48 2025 +0300

    git save article
From a technical perspective, the alias setup updated the ~/.gitconfig file, adding a row to the alias section, like this:
[alias]
	last = log -1 HEAD
As you see, using git aliases, you can do what the name suggests: create a shorthand for a certain Git command you use frequently. However, to get the most out of them, we'll need to go slightly beyond that.
Unlocking Full Git Aliases Potential with ! operator
Let's imagine a situation where you need to perform a git operation, but also need to use a non-git command in a process. This is where the true power of git aliases comes into play. Starting your alias with the ! operator, you can call commands that do not belong to Git. Let's see this in action:
git config --global alias.hello '!echo "Hello From Git Alias"'With that in place, you will be able to call git hello and get the expected Hello From Git Alias.
You can even use shell arguments like this:
git config --global alias.echo '!echo "from git: $1"'Here's what you will get from calling git echo one:
from git: one oneWell, it printed what we expected, but for some reason, it also duplicated the one. This is a peculiar behaviour of git aliases - for some reason, they print the arguments passed after the command output. Gladly, we can work around it by wrapping our script in a function and calling it:
!f() {

}; f
Here's how it will look in our case:
git config --global alias.echo '!f() {
    echo "from git: $1"
}; f'
With the updated setup, running git echo one will give us the compact from git: one. By the way, wrapping our scripts in functions also helps with complex script constructs like the if.
This is enough of the fundamentals. Now, let's jump to building something real!
Getting the Current Branch Name with current Alias
Getting the current branch name is a very common task when you are working with git. Of course, you can see it using the git status command. Here's an example of what you might see:
On branch main
Your branch is up to date with 'origin/main'.

nothing to commit, working tree clean
However, this will print a lot of additional information, which is not suitable if you want to use it in another script. In this scenario, you should use git rev-parse --abbrev-ref HEAD.
This command seems to be a canonical candidate for a Git alias - it is cumbersome, hard to remember, but does a very common job. Let's call our alias current:
git config --global alias.current 'rev-parse --abbrev-ref HEAD'Now, running git current, we should be able to see just the current branch name.
We can also now use this alias in another alias. Let's see it in action by printing a nice message utilizing the git current and the ! operator:
git config --global alias.echo-current '!echo "📌 Current Git Branch: $(git current)"'Here's what we should see from git echo-current:
📌 Current Git Branch: mainHurray, we've made a useful Git alias. We'll use it in the next section to build something even cooler.
Making The Alias. Solving The Verbosity Of Fully Saving Changes
The next task we are going to simplify with an alias is perhaps the most common git task of all: saving changes. Saving changes normally implies 3 steps:
- Adding Changes to Git
- Committing The Changes
- Pushing the Changes to a remote branch
Let's dissect those steps and see which commands we have for performing all of the steps.
- Add Changes to Git. By default,
git addexpects the name of the file to be added. However, most of the time, you just want to add everything you have, so we'll use the--allflag:
git add --all- Commit The Changes. Here we'll just use a verbose version of the command, passing a message passed to the
savecommand as a commit message:
git commit --message "$1"- Push the Changes. Beyond performing the push, we should also ensure a remote branch exists. Here, our previously created
currentalias comes into play. Combined with the--set-upstreamargument, it makes sure the local branch is connected to the remote branch with the same name:
git push --set-upstream origin $(git current)All we have to do is call the commands above in a single alias. Let's also wrap it in a function to see a proper output. Here's what we might get:
git config --global alias.save '!f() {
    git add --all
    git commit --message "$1"
    git push --set-upstream origin $(git current)
}; f'
After performing the setup, we should be able to save our changes using just git save "My Changes".
Here's an example output of the command.
[git-save-basic-texts d414d3b] git save basics text
 1 file changed, 18 insertions(+), 4 deletions(-)
Enumerating objects: 11, done.
Counting objects: 100% (11/11), done.
Delta compression using up to 8 threads
Compressing objects: 100% (5/5), done.
Writing objects: 100% (6/6), 1.64 KiB | 1.64 MiB/s, done.
Total 6 (delta 3), reused 0 (delta 0), pack-reused 0
remote: Resolving deltas: 100% (3/3), completed with 3 local objects.
remote:
remote: Create a pull request for 'git-save-basic-texts' on GitHub by visiting:
remote:      https://github.com/astorDev/nice-shell/pull/new/git-save-basic-texts
remote:
To https://github.com/astorDev/nice-shell.git
 * [new branch]      git-save-basic-texts -> git-save-basic-texts
branch 'git-save-basic-texts' set up to track 'origin/git-save-basic-texts'.
Although we can sort of figure out what has happened by the output, it is quite a challenge. Let's improve the output readability in the next section.
Improving Transparency with Nice-Shell
To make our alias nicer, let's add some log messages with the commands we are executing and add validation. We'll utilize a nice-shell script for that. First, let's source it:
source /dev/stdin <<< "$(curl -sS https://raw.githubusercontent.com/astorDev/nice-shell/refs/heads/main/.sh)"The only thing we'll need to validate is that there was a commit message supplied:
if [ -z "$1" ]; then
    throw "Commit message was not provided"
fi
Beyond that, let's log the command we are executing, along with some comments, like this:
log "Adding all files to git (git add --all)"Here's the complete script:
source /dev/stdin <<< "$(curl -sS https://raw.githubusercontent.com/astorDev/nice-shell/refs/heads/main/.sh)"

if [ -z "$1" ]; then
    throw "Commit message was not provided"
fi

log "Adding all files to git (git add --all)"
git add --all

log "Committing changes (git commit --message \"${1}\")"
git commit --message "$1"

log "Pushing changes to the remote repository (git push --set-upstream origin $(git current))"
git push  --set-upstream origin $(git current)

log "Changes have been saved successfully ✅"
Let's now wrap it in a function and pass it to the alias setup.
git config --global alias.save '!f() {
source /dev/stdin <<< "$(curl -sS https://raw.githubusercontent.com/astorDev/nice-shell/refs/heads/main/.sh)"
if [ -z "$1" ]; then
throw "Commit message was not provided"
fi
log "Adding all files to git (git add --all)"
git add --all
log "Committing changes (git commit --message \"${1}\")"
git commit --message "$1"
log "Pushing changes to the remote repository (git push --set-upstream origin $(git current))"
git push --set-upstream origin $(git current)
log "Changes have been saved successfully ✅"
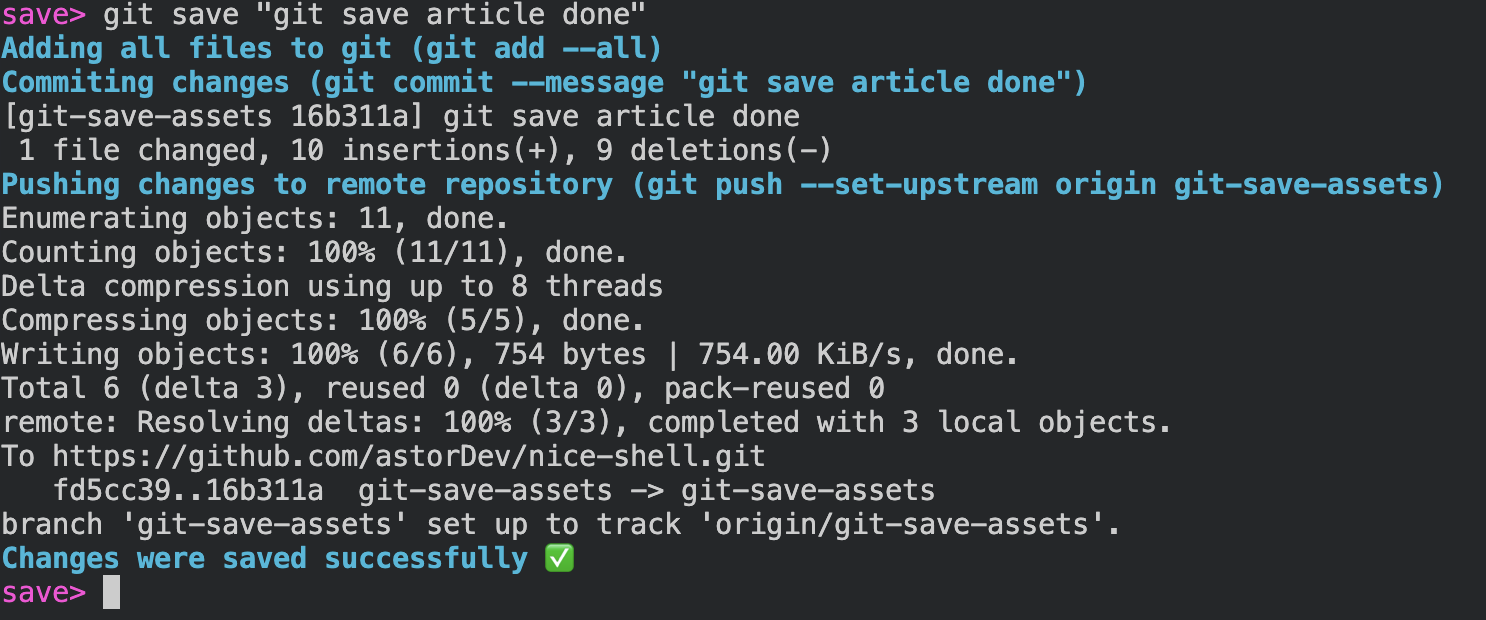
}; f'Now, after executing the command below:
git save "My Changes"You should see Changes have been saved successfully ✅ printed!
This wraps up this article. Let's do a quick recap and see a picture of what the result of our command might look like!
TLDR;
In this article, we've created a git alias called save. It allows us to add, commit, and push changes using just one command. Instead of recreating it, you can install it straight from GitHub with this one-liner:
curl -sS https://raw.githubusercontent.com/astorDev/nice-shell/main/git/save/install.sh | shAfter you see "✅ Installed the git save alias", you will be able to use the alias like this:
The script, as well as this article, is part of the nice-shell repository, trying to help your shell experience be nicer. Don't hesitate to give the repository a star! ⭐
Claps for this article are also appreciated! 😊