Flutter Data Management
Practically, any useful Flutter app will communicate with a data store, whether an API, local storage, or something more exotic. When developing my side project I've come to a need to architect my widgets and applications layers in a way to support both API-first data management and local storage, with a simple way to switch between the modes. So, I decided to make a small app, serving as an architectural experiment. In this article, I'll share what it came down to.

The Goal
The app we are going to build should allow us to:
- See a list of items
- Add a new item
- Remove an item
But what's more interesting is that the app should be able to run in multiple "modes", with an ability to switch between those modes without changing anything in the UI. The modes are:
- Memory-only, meaning data is just manipulated locally
- Memory-first. Where we have a background process syncing data via an API and showing the status of this sync.
- API-first. Where the app waits while the changes are applied in the API and only then refreshes the list of items
Let's jump to the code!
The Fundament
We'll start straight from the most important class in the whole experiment - the Manager abstract class. The Manager exposes ValueListenable<List<String>>, which our UI can listen to display the item list, and the optional ValueListenable<SyncState>, used to display the state of background synchronization, when it's applicable. Equally importantly, the Manager provides methods for the operation you can do in the app: add, remove, and reload if it's applicable:
abstract class Manager {
  ValueListenable<List<String>> get collection;
  ValueListenable<SyncState>? get syncStateListenable => null;

  Future<void> add(String item);
  Future<void> remove(String item);
  Future<void> reload() async {}
}
You may imagine what SyncState look like, but here's my implementation, so that we won't get confused:
class SyncState {
  bool running;
  Object? unresolvedError;

  SyncState({
    this.running = false,
    this.unresolvedError
  });

  factory SyncState.error(Object error) {
    return SyncState(running: false, unresolvedError: error);
  }

  factory SyncState.inProgress() {
    return SyncState(running: true);
  }

  factory SyncState.done() {
    return SyncState(running: false);
  }
}
The abstraction is enough for us to build our UI, so let's do just that!
The UI
Our root widget will accept a manager, and pass it down to just three app components:
class Playground extends StatelessWidget {
  final Manager manager;

  const Playground({
    super.key,
    required this.manager,
  });

  @override
  Widget build(BuildContext context) {
    return Scaffold(
      body: CollectionListView(manager: manager),
      bottomSheet: manager.syncStateListenable == null ? null : SyncStateBottomSheet(manager: manager),
      floatingActionButton: AddButton(manager: manager)
    );
  }
}
The first component, taking most of our app real estate is the CollectionListView, which listens to the managers items collection and provides a button, that calls the managers delete operation:
class CollectionListView extends StatelessWidget {
  final Manager manager;

  const CollectionListView({
    super.key,
    required this.manager,
  });

  @override
  Widget build(BuildContext context) {
    return ValueListenableBuilder(
      valueListenable: manager.collection,
      builder: (context, items, child) {
        return ListView.builder(
          itemCount: items.length,
          itemBuilder: (context, index) {
            return ListTile(
              title: Text(items[index]),
              trailing: DynamicIconButton(
                onPressed: () => manager.remove(items[index]),
                icon: Icon(Icons.delete)
              )
            );
          }
        );
      }
    );
  }
}

class DynamicIconButton extends StatelessWidget {
  final ValueNotifier<bool> inProgressNotifier = ValueNotifier(false);
  final Future Function() onPressed;
  final Widget icon;

  DynamicIconButton({
    super.key,
    required this.onPressed,
    required this.icon,
  });

  @override
  Widget build(BuildContext context) {
    return ValueListenableBuilder(
      valueListenable: inProgressNotifier,
      builder: (context, inProgress, child) {
        if (inProgress) {
          return CircularProgressIndicator();
        }

        return IconButton(
          icon: icon,
          onPressed: () {
            inProgressNotifier.value = true;
            var future = onPressed();
            future.whenComplete(() {
              inProgressNotifier.value = false;
            });
          },
        );
      }
    );
  }
}
The next component is the AddButton. What's interesting about it is that it also handles errors, which may occur during the addition and shows an appropriate SnackBar:
class AddButton extends StatefulWidget {
  final Manager manager;

  const AddButton({
    super.key,
    required this.manager,
  });

  @override
  State<AddButton> createState() => _AddButtonState();
}

class _AddButtonState extends State<AddButton> {
  ValueNotifier<bool> addInProgress = ValueNotifier(false);

  @override
  Widget build(BuildContext context) {
    return ValueListenableBuilder(
      valueListenable: addInProgress,
      builder: (ctx, inProgress, child) {
        if (inProgress) {
          return CircularProgressIndicator();
        }

        return IconButton.filled(
          icon: Icon(Icons.add),
          onPressed: () {
            addInProgress.value = true;
            var additionFuture = widget.manager.add('Item ${Uuid().v4()}');
            additionFuture.whenComplete(() {
              addInProgress.value = false;
            });

            additionFuture.onError((err, stack) {
              ScaffoldMessenger.of(ctx).showSnackBar(
                SnackBar(
                  duration: Duration(milliseconds: 300),
                  behavior: SnackBarBehavior.floating,
                  width: 300,
                  content: Text('Failed to add item'))
                );
            });
          },
        );
      }
    );
  }
}
Finally, we have an optional SyncStateBottomSheet, that is shown in case our manager provides a syncStateListenable. The bottom sheet will also provide a user with the ability to load data from a synchronization target in case we have an error, the code is pretty simple:
class SyncStateBottomSheet extends StatelessWidget {
  final Manager manager;

  const SyncStateBottomSheet({
    super.key,
    required this.manager,
  });

  @override
  Widget build(BuildContext context) {
    return ValueListenableBuilder(
      valueListenable: manager.syncStateListenable!,
      builder: (context, syncState, child) {
        if (syncState.running) {
          return Container(
            padding: EdgeInsets.all(8),
            child: Text('⏳ Syncing Data')
          );
        }

        if (syncState.unresolvedError != null) {
          return Container(
            padding: EdgeInsets.all(8),
            child: TextButton(
              child: Text('❌ Sync Error, tap to reload'),
              onPressed: () {
                manager.reload();
              }
            )
          );
        }

        return Container(
          padding: EdgeInsets.all(8),
          child: Text('✅ Data is Synced')
        );
      }
    );
  }
}
Setting up the UI is fun, but what's even more fun is seeing it in action, for that we'll need to implement a real manager. Let's get to that!
Memory-Only Manager
The first manager implementation will be the simplest one: just doing the operation in memory.
class MemoryOnlyManager extends Manager {
  final ObservableCollection<String> _collection = ObservableCollection();

  @override
  ValueListenable<List<String>> get collection => _collection;

  @override
  Future<void> add(String item) async {
    _collection.add(item);
  }

  @override
  Future<void> remove(String item) async {
    _collection.remove(item);
  }
}
The class just utilized ObservableCollection, which is a very simple wrapper over a normal List<T>:
class ObservableCollection<T> extends ChangeNotifier implements ValueListenable<List<T>> {
  List<T> _items = [];

  @override
  List<T> get value => _items;

  void add(T item) {
    _items.add(item);
    notifyListeners();
  }

  void remove(T item) {
    _items.remove(item);
    notifyListeners();
  }

  void reset(List<T> items) {
    _items = items.toList();
    notifyListeners();
  }
}
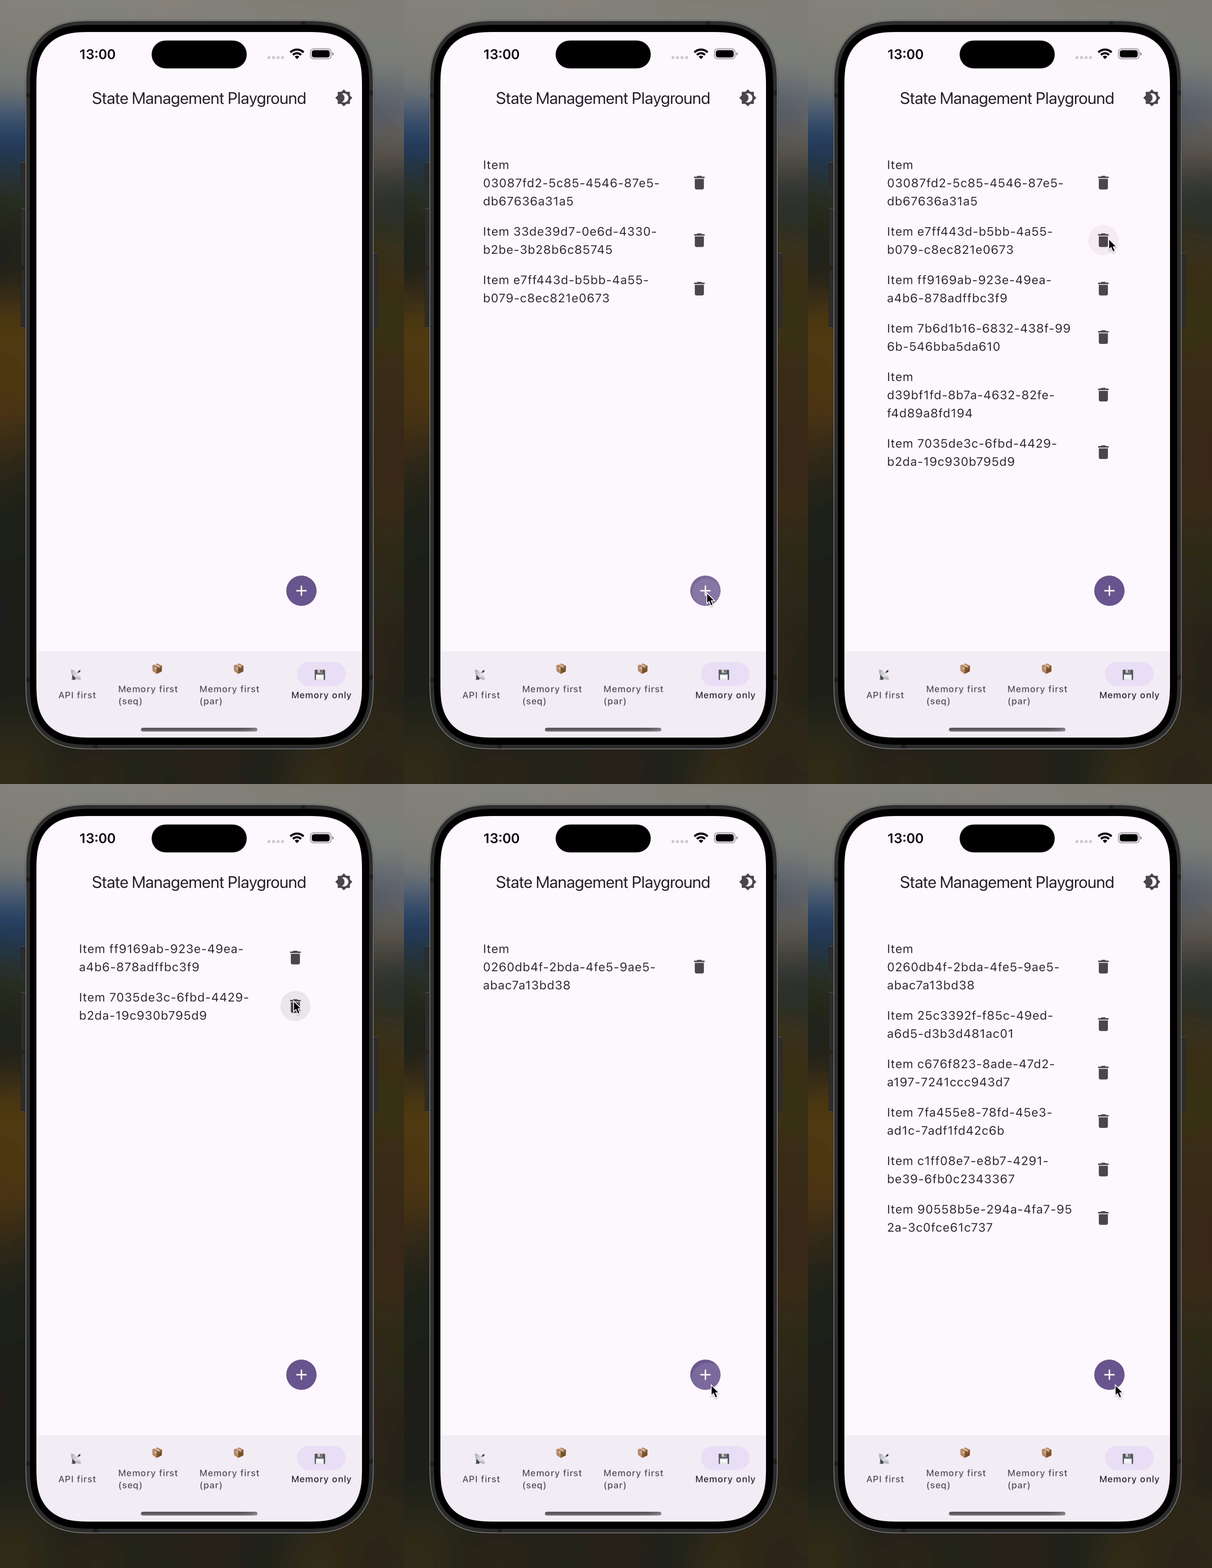
Here's what the UI looks like with our first manager implementation:

Now let's do something more interesting!
Memory-First Manager
The next manager will have a background synchronization with an API. It will also utilize ObservableCollection and first apply changes to it, but in addition to that it will add a synchronization action matching the performed action:
class MemoryFirstManager extends Manager {
  SyncController syncController;
  ApiEmulator api;

  MemoryFirstManager({
    required this.syncController,
    required this.api
  });

  final ObservableCollection<String> _collection = ObservableCollection();

  @override
  ObservableCollection<String> get collection => _collection;

  @override
  Future<void> add(String item) async {
    _collection.add(item);
    syncController.add(() => api.post(item));
  }

  @override
  ValueListenable<SyncState>? get syncStateListenable => syncController;

  @override
  Future<void> remove(String item) async {
    _collection.remove(item);
    syncController.add(() => api.delete(item));
  }

  @override
  Future<void> reload() async {
    syncController.reset(() async {
      final items = await api.get();
      _collection.reset(items);
    });
  }
}
You may notice, that it utilizes an ApiEmulator as a target of synchronization operations. The emulator is nothing special, just a wrapper over List<String> that delays before completing operations and sometimes throws errors:
class ApiEmulator {
  final List<String> items = [];

  Duration delay;
  final int failsOnceIn;

  ApiEmulator({
    this.delay = const Duration(milliseconds: 300),
    this.failsOnceIn = 3
 });

  Future<void> post(String item) async {
    print('posting $item');
    await Future.delayed(delay);
    if (DateTime.now().millisecond % failsOnceIn == 0) {
      throw Exception('Failed to post $item');
    }

    print('recording item to api emulator storage. expected to have ${items.length + 1} items');
    items.add(item);
    print('posted $item, items count: ${items.length}');
  }

  Future<void> delete(String item) async {
    print('deleting $item');
    await Future.delayed(delay);
    items.remove(item);
    print('deleted $item');
  }

  Future<List<String>> get() async {
    await Future.delayed(delay);
    print('returning items. items count:  ${items.length}');
    return items;
  }
}
The more interesting class is the SyncController, which in reality is an interface:
abstract class SyncController implements ValueListenable<SyncState> {
  void add(Future Function() action);
  void reset(Future Function() action);
}
So to see the MemoryFirstController in action we first need to implement the SyncController. In the first version we'll just trigger the future as soon as it is added to the "queue", we'll call it ParallelSyncController:
class ParallelSyncController extends ChangeNotifier implements SyncController {
  final List<Future> futures = [];
  Object? unresolvedError;

  @override
  void add(Future Function() action) {
    var future = action();
    futures.add(future);

    if (futures.length == 1) {
      notifyListeners();
    }

    future.then(
      (_) {
        futures.remove(future);
        if (futures.isEmpty) {
          notifyListeners();
        }
      },
      onError: (err, stack) {
        futures.remove(future);
        unresolvedError = err;
        notifyListeners();
      }
    );
  }

  @override
  void reset(Future Function() action) {
    unresolvedError = null;
    Future.wait(futures).then(
      (value) {
        add(action);
        notifyListeners();
      }
    );
  }

  @override
  SyncState get value => SyncState(
    running: futures.isNotEmpty,
    unresolvedError: unresolvedError
  );
}
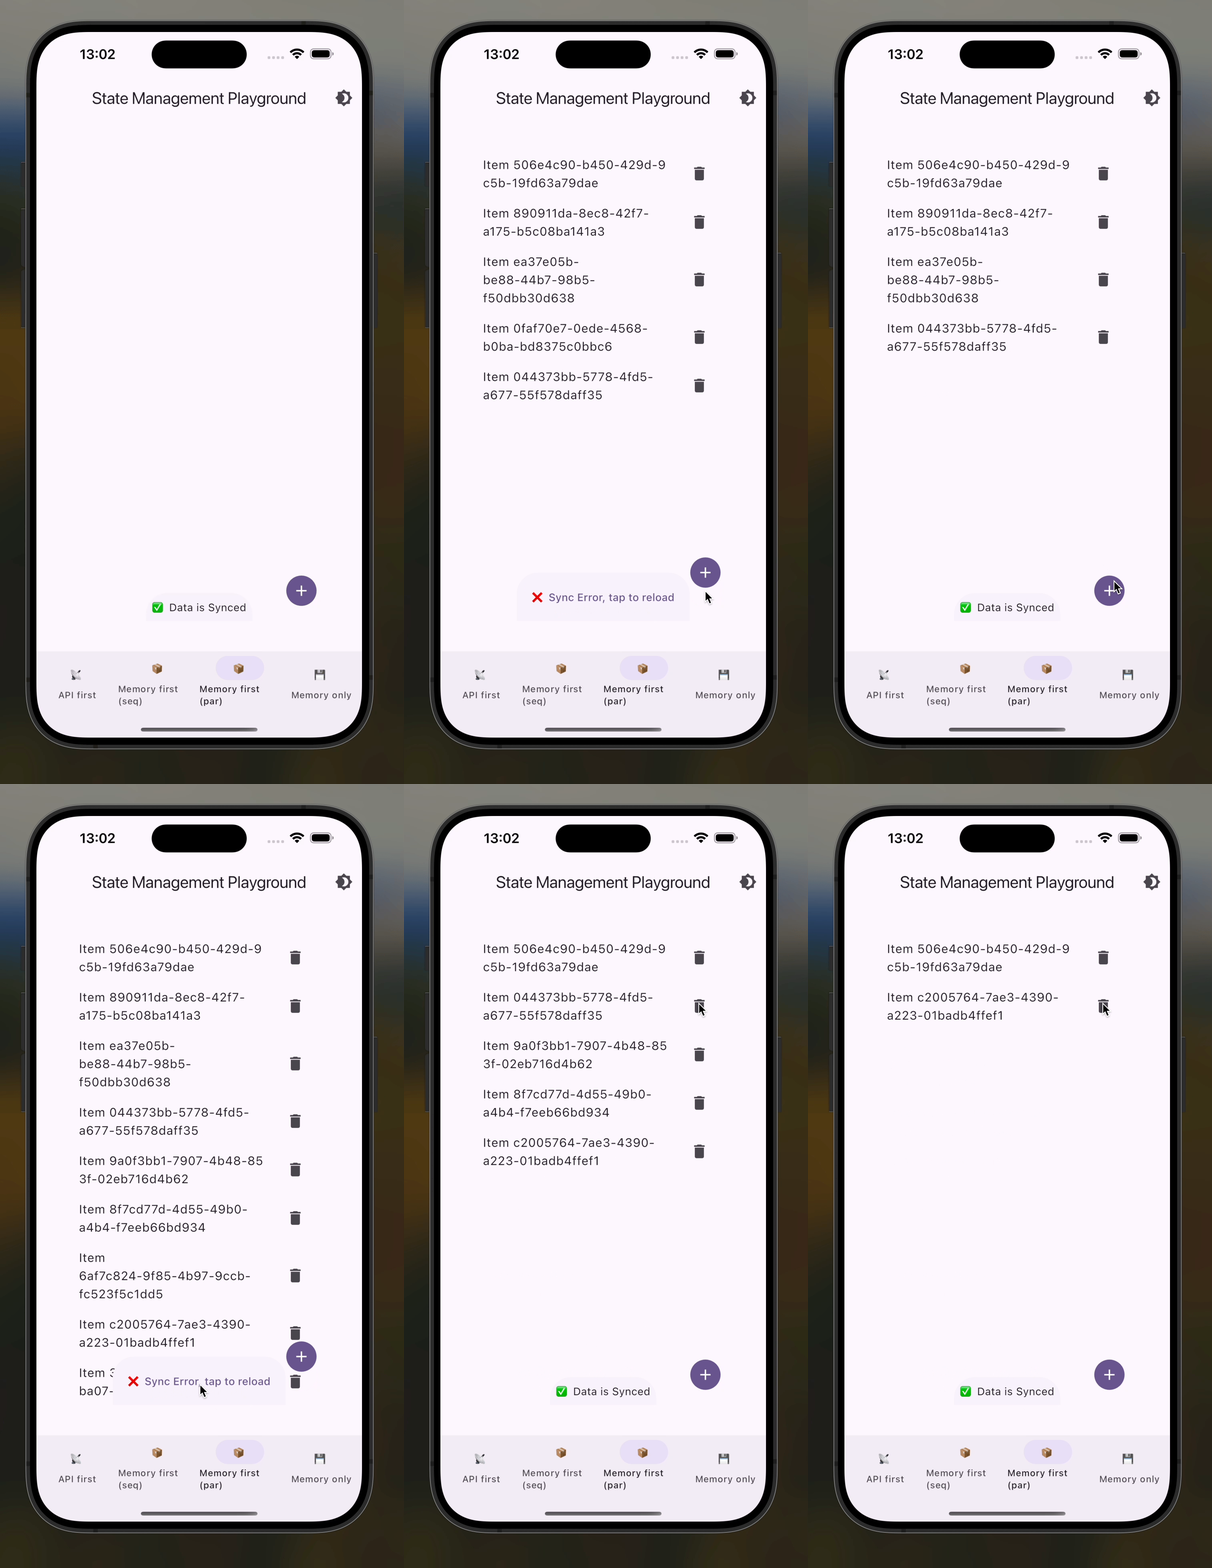
And this is what our UI will look like with this implementation:

The implementation is relatively simple and works pretty good. However, in a real-world app data is frequently inter-connected, so the operations need to be done in the order, in which they occur. That's why we have another SyncController implementation:
class SequentialSyncController extends ChangeNotifier implements SyncController {
  final List<Future Function()> _futures = [];
  Object? _unresolvedError;

  @override
  void reset(Future Function() futureFactory) {
    _futures.clear();
    _unresolvedError = null;
    add(futureFactory);
  }

  @override
  void add(Future Function() futureFactory) {
    _futures.add(futureFactory);

    if (_futures.length == 1) {
      processToNext();
      notifyListeners();
    }
  }

  void processToNext() {
    var factory = _futures.first;
    var future = factory();

    future.then(
      (_) {
        _futures.removeAt(0);
        if (_futures.isNotEmpty) {
          processToNext();
        } else {
          notifyListeners();
        }
      },
      onError: (err, stack) {
        _futures.clear();
        _unresolvedError = err;

        notifyListeners();
      }
    );
  }

  @override
  SyncState get value {
    print('returning value to the listenable');

    if (_unresolvedError != null) {
      return SyncState.error(_unresolvedError!);
    }

    return _futures.isNotEmpty ? SyncState.inProgress() : SyncState.done();
  }
}
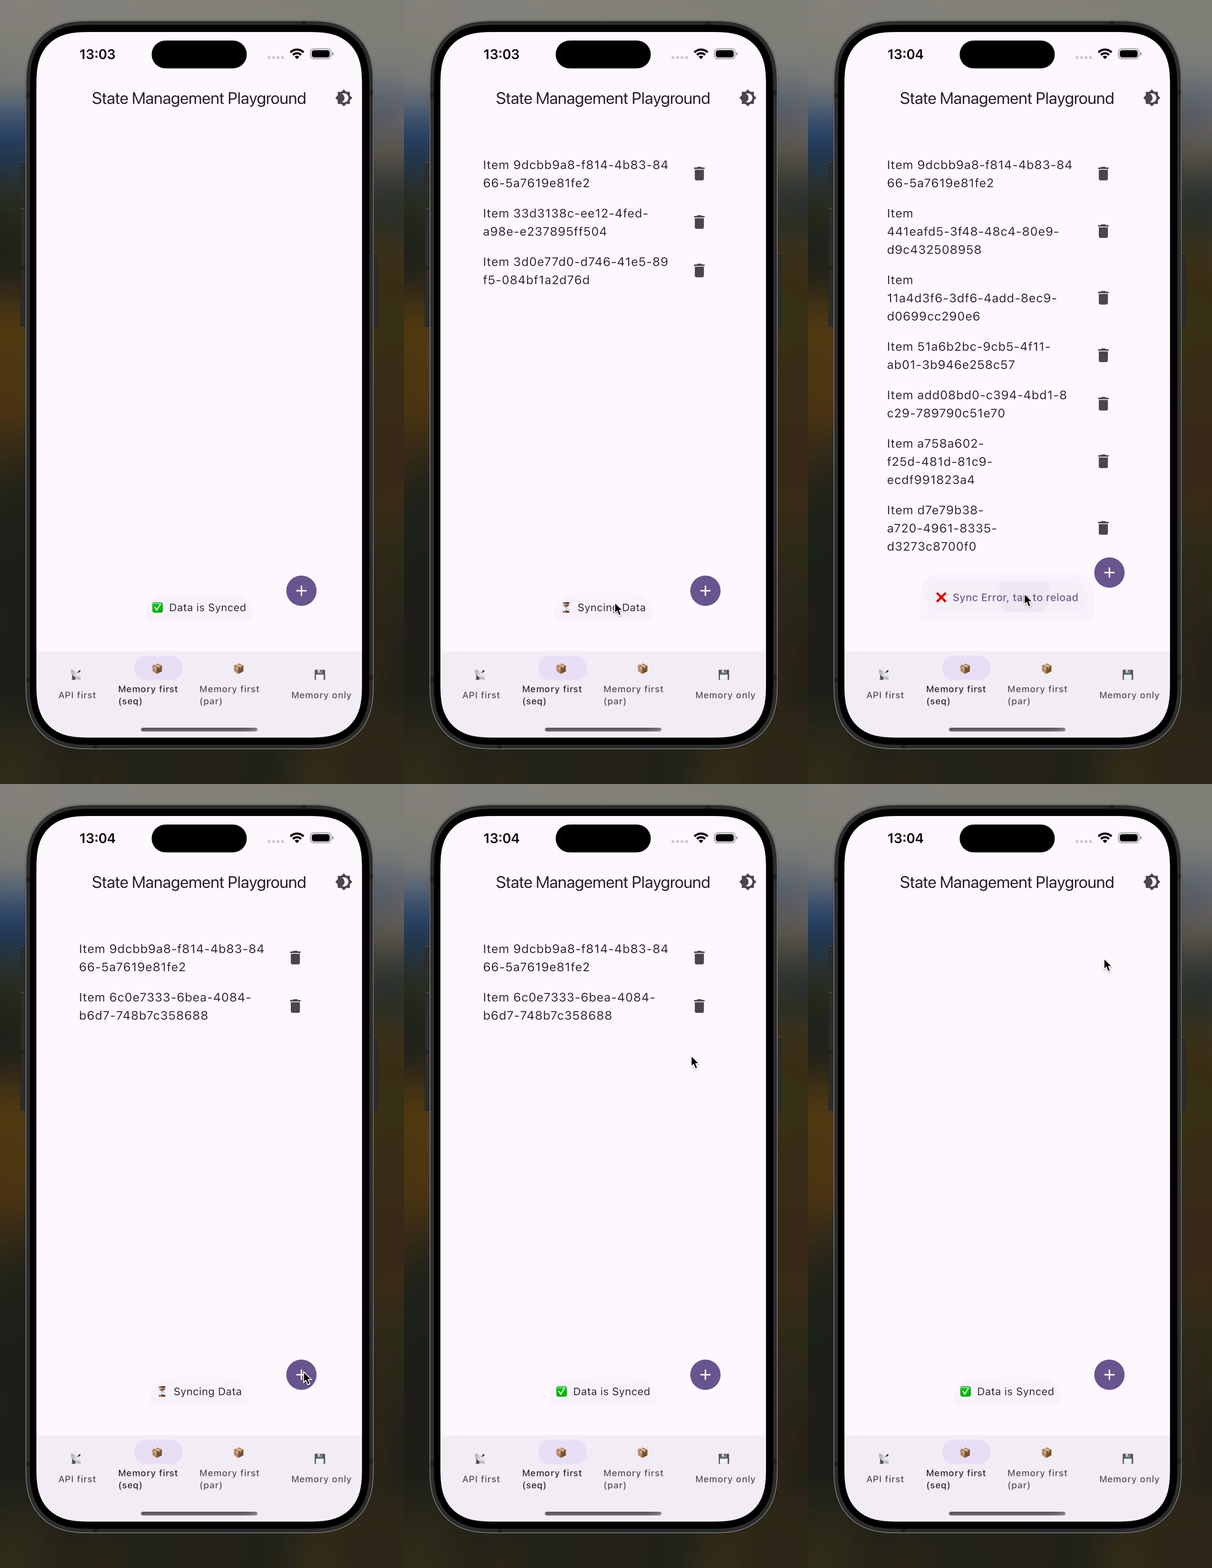
With that synchronization technique we'll have a slightly slower synchronization, which, nevertheless, may be the only option:

The memory first scenario is pretty complicated, so the last scenario we are going to cover in this article should feel like a relief.
API-First Manager
In the last implementation, we'll just call the appropriate API method and then "fetch" up-to-date data from the API. Here's the code:
class ApiFirstManager extends Manager {
  final ApiEmulator api;
  final ObservableCollection<String> _collection = ObservableCollection<String>();

  @override
  ValueListenable<List<String>> get collection => _collection;

  ApiFirstManager({ required this.api }) {
    _collection.reset(api.items);
  }

  @override
  Future<void> add(String item) async {
    await api.post(item);
    await reload();
  }

  @override
  Future<void> remove(String item) async {
    await api.delete(item);
    await reload();
  }

  @override
  Future<void> reload() async {
    final items = await api.get();
    _collection.reset(items);
  }
}
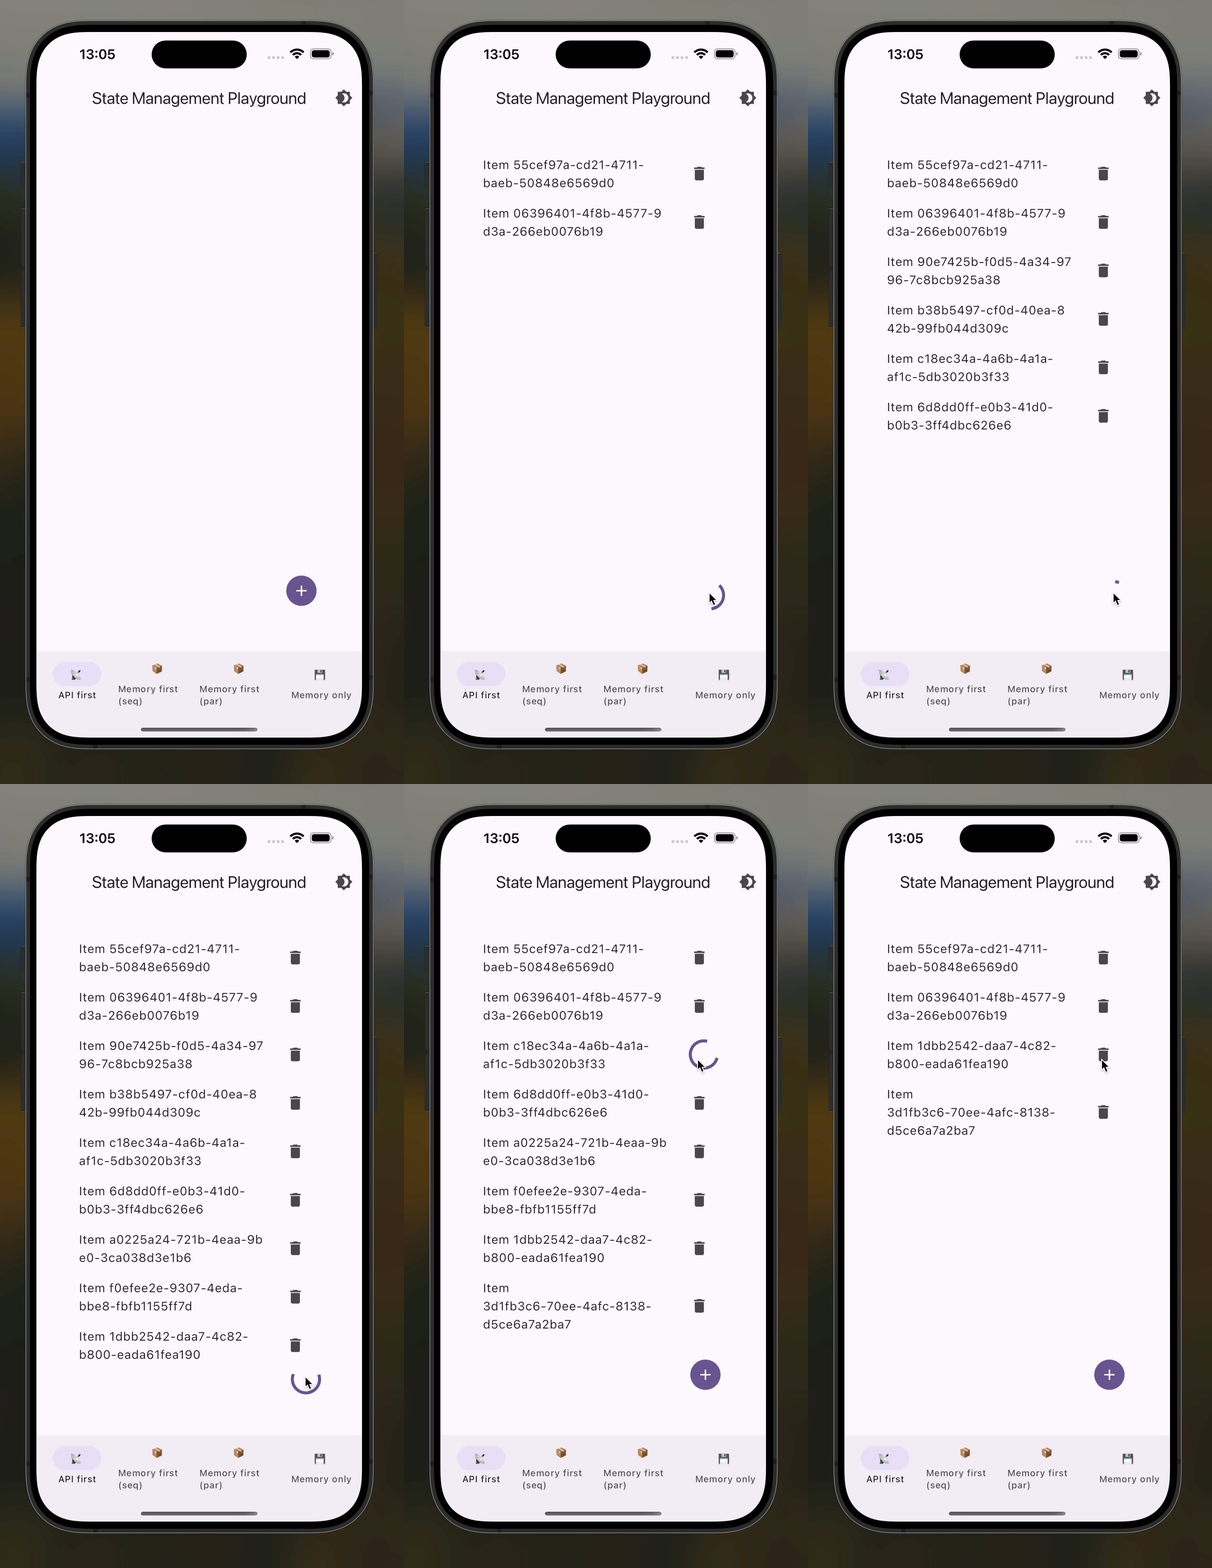
This time visual behaviour will vastly vary, with operation buttons locking on every operation waiting for completion of the tasks triggered on the Manager:

The mode is the last thing I want to show you in this article, so let me just finish this up with a few final words.
Wrapping Up
The article gives you my take on implementing multi-scenario data management for a Flutter app. It introduces a Manager pattern, with the manager controlling the application data flow. The approach seems a bit green for me and I would like to hear your thoughts in the comments below and ... claps are also appreciated 👉👈